


When we first started working with edge computing and TensorRT video analytics, we had little idea how to optimize inference for real-time applications. Our project required deploying AI models on the NVIDIA Jetson AGX Orin device, where speed was critical. Not only did we have to process large models individually, but we also needed to run the feature extraction and inference pipelines in real-time. The challenge? High latency.
Hitting a wall: The latency struggle in video analytics
We were building a model that extracted multiple features from an image—pose landmarks, facial landmarks, segmentation masks, depth estimation, and face detection. While the models worked well, the inference time was painfully slow. Every millisecond counted, and we needed to find a way to accelerate the processing without compromising accuracy.
One of the biggest bottlenecks we faced was depth estimation. The inference time of our depth estimation model was too high for real-time processing, making it a major roadblock. While searching for solutions, we came across DepthAnythingV2’s TensorRT GitHub page. Curious about its potential, we explored the repository, examined the optimizations, and decided to give it a shot. The results were impressive—switching to the TensorRT version significantly reduced inference time. That’s when we started wondering—what if we could convert all our models to TensorRT?
The breakthrough: How TensorRT transformed our AI inference
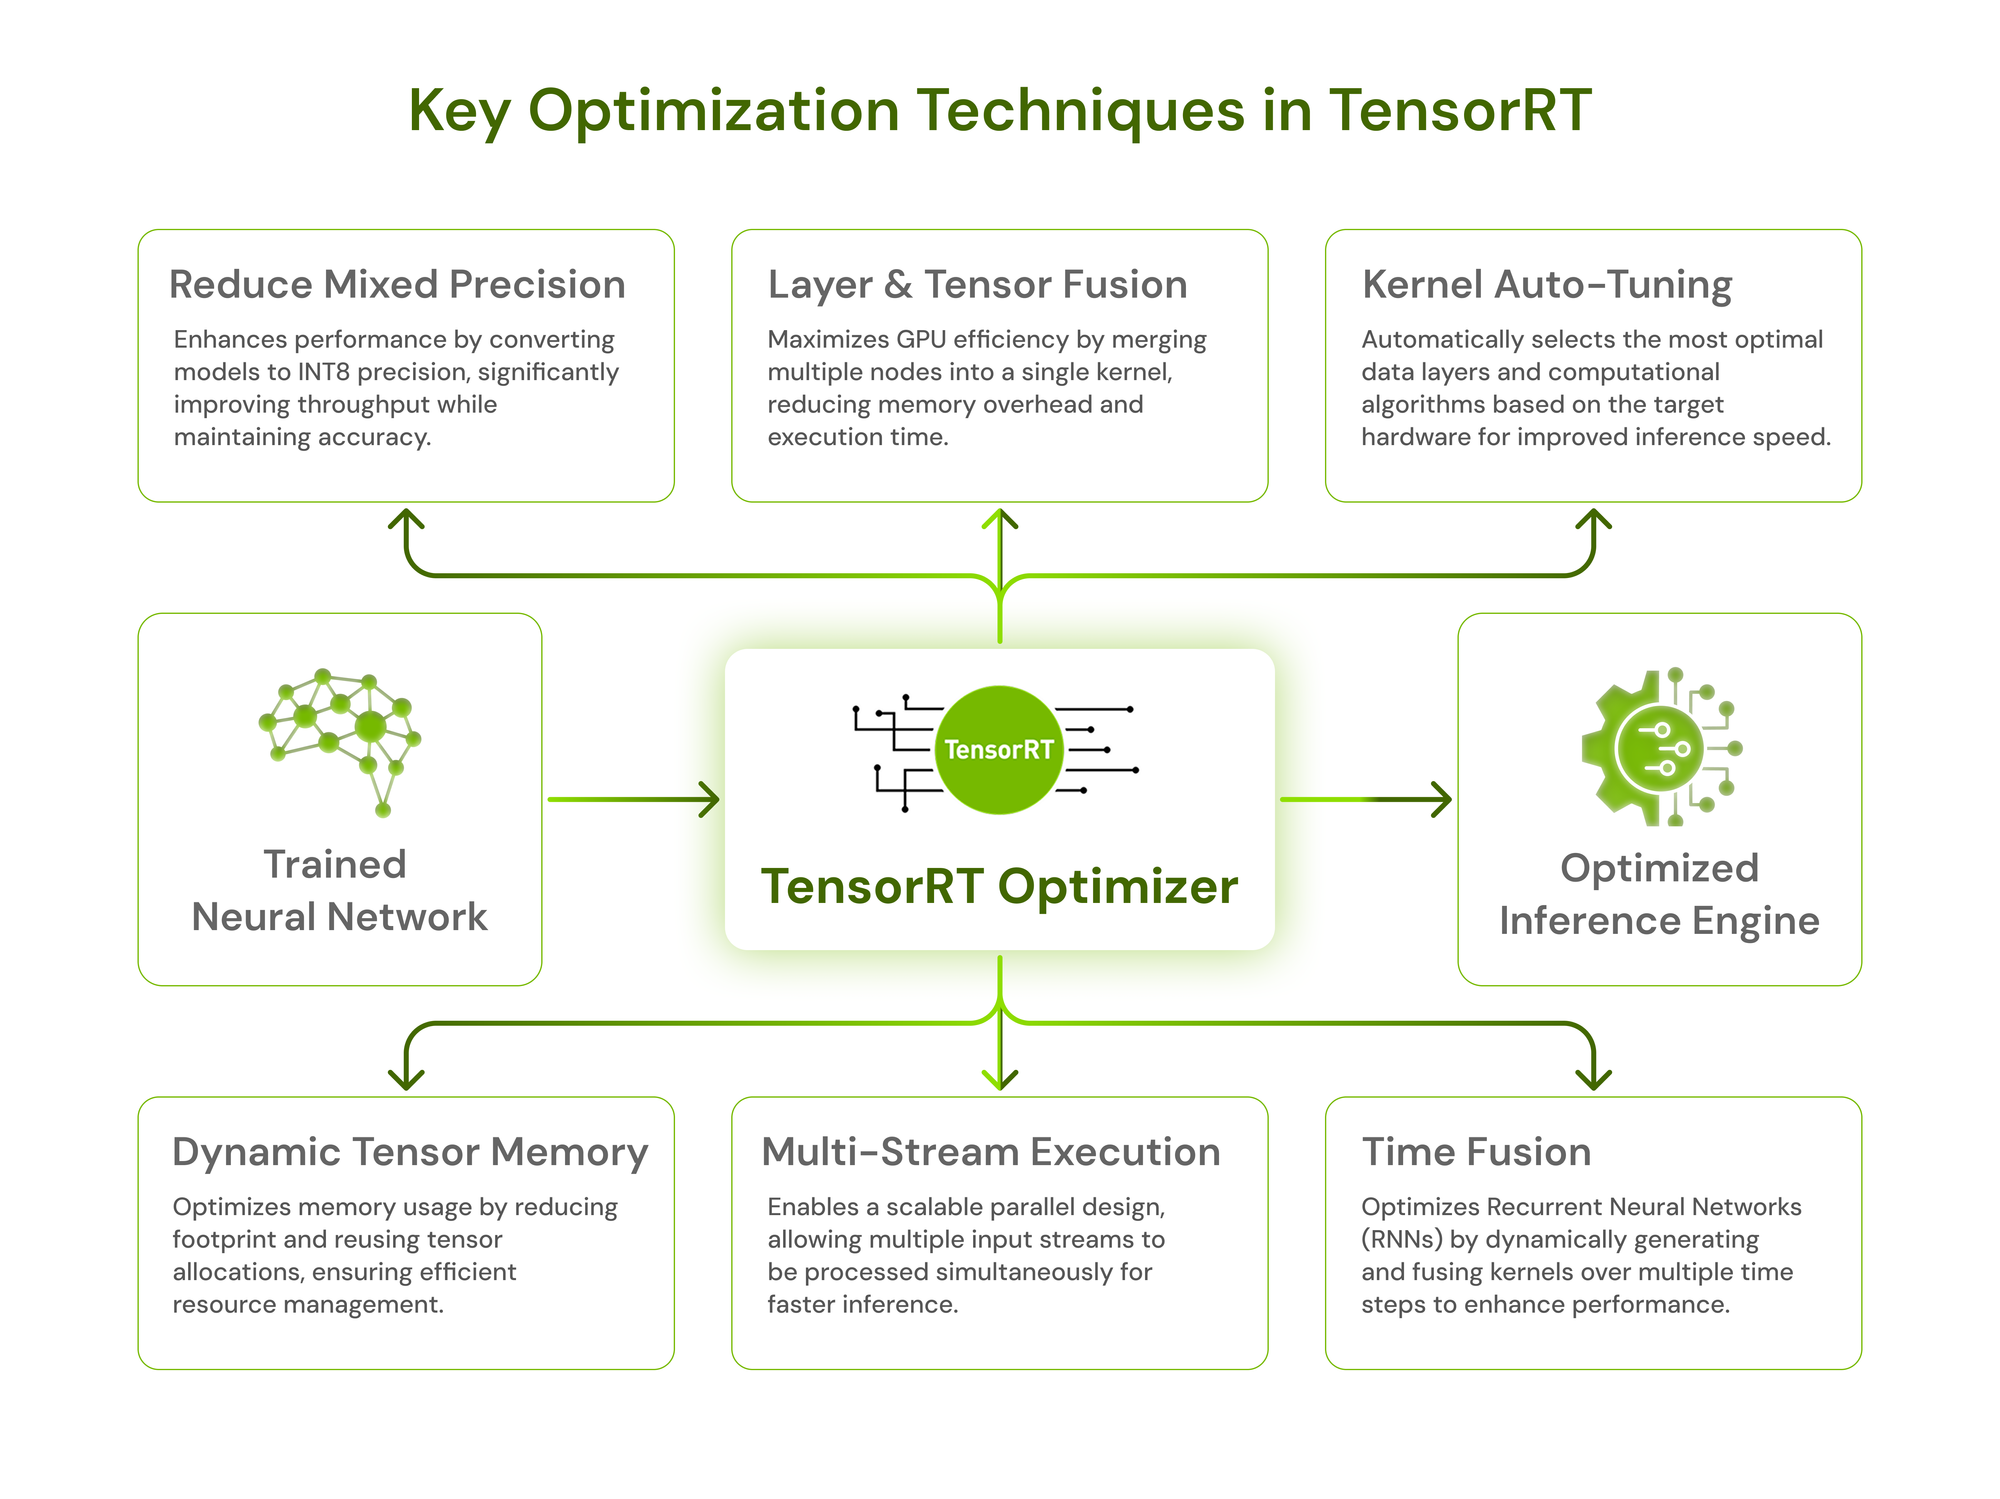
We started researching TensorRT, NVIDIA’s inference optimization engine built for accelerating deep learning models on GPUs. Unlike traditional frameworks, TensorRT compiles models into highly optimized engines, applying a set of optimizations that make inference lightning-fast. As we explored its optimizations and different conversion methods, we began converting models one by one—YOLO (for pose, object detection, segmentation), depth estimation, and face detection—ensuring each integrated smoothly into the pipeline for real-time performance. Some of the key techniques TensorRT uses include layer fusion, precision conversion, kernel auto-tuning, and efficient memory management.
This article is the first in a series where we’ll walk you through how we optimized our model using TensorRT, the methods we explored, and the incredible improvements in inference speed. If you’ve ever struggled with model latency, this might just save you hours (or even days) of frustration!
Setting up TensorRT for high-performance video processing
The first step was to get TensorRT running. We found that it can be installed in two ways:
- JetPack SDK (for Jetson devices): Comes with TensorRT pre-installed when flashing Jetson boards.
- Manual Installation: If TensorRT isn’t included in the system, it can be downloaded from Installing TensorRT.
For our Jetson AGX Orin, we reflashed it with JetPack 6.0, and everything was set up right out of the box. It came pre-installed with TensorRT, CUDA, cuDNN, DeepStream, and OpenCV, making the setup seamless and saving us the hassle of manual installations.
TensorRT hardware and software compatibility: What you need to know
Before optimizing, we needed to ensure TensorRT compatibility. A key requirement is a compute capability of 7.5 or higher to unlock TensorRT’s full potential. You can verify hardware and software compatibility using the TensorRT Support Matrix.
To check if our GPU was compatible, we ran the following simple Python command:
Here’s a table you can quickly check to see if your device is compatible with TensorRT:
| Hardware | GPU Series | Compute Capability | JetPack Compatibility | Server Compatibility |
|---|---|---|---|---|
| NVIDIA Data Center GPUs | A100, H100 | 8.0+ | N/A | Supported |
| Jetson AGX Orin | Orin | 8.7 | JetPack6.0+ | N/A |
| Jetson Xavier | Xavier Series | 7.2 | JetPack 4.5+ | N/A |
| GeForce RTX Series | RTX 30xx, 40xx | 8.0+ | N/A | Supported (workstations) |
With compatibility confirmed, it was time to move forward. Our system—Jetson AGX Orin—has a compute capability of 8.7, meeting the requirements for advanced TensorRT optimizations. Now, the real challenge began—converting our model into a TensorRT-optimized engine to maximize inference performance.
Optimizing video models: Streamlined techniques for TensorRT conversion
TensorRT supports multiple methods for converting models into optimized engines. We explored several approaches to find the one that best suited our model’s needs. Here’s a quick rundown:
- trtexec CLI Tool: A command-line tool to quickly convert ONNX models to TensorRT engines and benchmark their performance.
- torch2trt: A lightweight Python library to convert PyTorch models to TensorRT engines, simplifying deployment.
- TensorRT Python API: Provides granular control to parse, build, and optimize models programmatically for TensorRT.
- Torch-TensorRT: An extension of PyTorch to directly compile and optimize models for TensorRT.
- DeepStream SDK: Automates the conversion and deployment of models for video analytics applications.
- NVIDIA TAO Toolkit: Use TAO Toolkit to optimize and deploy pretrained models directly in TensorRT.
- TensorFlow-TensorRT Integration (TF-TRT): A deep-learning compiler for TensorFlow that optimizes TF models for inference on NVIDIA devices.
Step-by-step: Converting our YOLO model to TensorRT
After successfully optimizing some models with TensorRT, we decided to do initial experiments with YOLO models, used for pose estimation, object detection, and segmentation. We chose to use trtexec because it is a command-line tool included in NVIDIA’s TensorRT SDK that allows us to benchmark networks, generate optimized TensorRT engines, and create serialized timing caches. It is typically located at:
Fixing "trtexec: command not found"
While running trtexec, we encountered the classic error:
This usually means the binary isn’t in the system’s PATH. A solution was creating a symbolic link to
make it accessible globally:
After this, we verified the installation with:
With TensorRT and trtexec ready to go, we moved on to converting our YOLO model into a TensorRT engine.
Prerequisites
- YOLO Python library - ultralytics.
- TensorRT with trtexec CLI tool.
- Required Python libraries: opencv-python,onnx,onnxruntime.
Step 1: Export the YOLOv11n model to ONNX format
To convert YOLO to TensorRT, we first needed to export it to ONNX format. The Ultralytics Python library makes this easy:
Save the following script as export_yolov11n.py:
Then we ran:
This produced a yolov11n.onnx file, which is the intermediate format before conversion to TensorRT.
Step 2: Convert the ONNX model to TensorRT using trtexec
With the ONNX model ready, we used trtexec to generate an optimized TensorRT engine. Since we wanted to maximize speed while keeping precision, we enabled FP16 mode:
Explanation of parameters:
- --onnx: Path to the ONNX model file.
- --saveEngine: Saves the optimized TensorRT engine.
- --fp16: Enables FP16 precision for faster inference.
Once the process was complete, we had a yolov11n.engine file—an optimized, serialized TensorRT model ready for deployment.
Step 3: Running inference on the TensorRT engine
The final step was testing the model's performance. We loaded the engine and ran inference with batch size 8 to leverage GPU parallelism:
Explanation of parameters:
- --loadEngine=model.engine: Loads the prebuilt TensorRT engine.
- --batch=8: Processes 8 inputs simultaneously, improving efficiency by utilizing the GPU more effectively.
More options for trtexec can be found in the TensorRT trtexec Documentation.
The results: A massive speed boost in video analytics with TensorRT
After conversion, we measured the performance, and the improvements were immediate, with the model delivering an average response time of just 2.6 milliseconds per image over 10 iterations and 10,592 total queries, demonstrating impressive speed and efficiency.
Conclusion: Key takeaways from our TensorRT optimization journey
With TensorRT, we efficiently processed multiple streams, running vision models for pose estimation, facial landmarks, object detection, segmentation, and depth estimation with minimal latency. Optimizing models while maintaining accuracy enabled smooth real-time performance, making the system ideal for edge deployment. If you’re working on edge AI applications, we highly recommend experimenting with TensorRT. Try different conversion methods, test various precision modes like FP16 and INT8, and see how much you can improve inference speed and memory usage.
This is just the first step—next, we’ll dive deeper into advanced TensorRT techniques and how to fine-tune performance even further. Stay tuned!